Friday, November 16, 2012

{Finally Finished It Friday: Holiday Calendar & Snowflake Blanket}

Recently I have decided that I must finish half done projects and projects that I planned on doing and haven't started yet but have all the materials for.  When I started to clean out boxes in the closet I discovered many projects that I forgot about, some that were started 8 years ago, yikes.  I decided it was time to get these done and I've made some good progress.  On Fridays I'll share of these long over-due projects with you.

Two years ago I started to make a Holiday Calendar for my son.  He was almost 4 and having a hard time with all the holiday happenings and not knowing what was coming up.  To add to the normal holidays, his birthday is the end of November.  I came up with the idea of a re-usable holiday calendar that spanned from Thanksgiving week thru New Years.


For the main part I used a duck cloth and a nice holiday print for the border.  I made sure to wash and dry the duck cloth first because it shrinks significantly.  With a little guy around I knew that there was good chance it would eventually need to be washed.  I drew my grid on the duck cloth with a water-soluble or disappearing ink marker then used a small zig-zag stitch to make the calendar squares.  I decided to use snaps to attach the number and holiday tags.  I used snaps because, at the time, I was sure my son would re-arrange them at will if I used velcro.  Snaps were also something that were difficult for him to use so I was also sneaking in a bit of occupational therapy when adding the number tag each day.  If I were to do it now that is almost 6 I would definitely use velcro.

 
 To make the number tags I used a stiff felt to cut squares, sewed on the snap part then added some pre-made felt shapes.  For the November numbers I used orange felt for the square and for the decorative shapes I found a package of leaves, apples, pumpkins and flowers that already had an adhesive applied to them.  For the numbers I used my Cricut machine and vinyl to make the numbers.  The December tags used red & white stiff felt for the squares.  I used an assortment of candy canes, stars, trees and ornaments for the themed decoration.  For the numbers I used number stickers.  January tags are made from light blue stiff felt and snowmen, the numbers were also stickers.


I made several "special" tags to add to the calendar so Milo would be able to see when the holidays and special events are.  These were mostly round tags with a felt shape representing the occasion.


To hang this I used Command Picture Hanging Strips.  I sewed one part onto the back of the calendar and used the adhesive to attach the other to the wall and they click together, sort of like velcro.  I LOVE this product because I live in an older house with plaster and lath walls which make nails nearly impossible to hang decorations, etc.


I am so excited this calendar is finally done in time for this holiday season and is ready to be used starting Monday.
~~~~~~~~~~~~
My second project was a quick one!  I found this lovely red and light blue snowflake fleece in a box, I'm guessing from 2 or 3 years ago.  I just love this color combination.  I wanted a light blue binding with a print on it so I knew I would have to make some bias tape, which sounds hard but it really isn't.  There is a great tutorial here if you are interested in making some too.  I used a light blue print with white stars to make the bias tape.  I cut the fleece too the largest rectangle I could then rounded the corners using a dinner plate as a guide.  I find the easiest way to attach bias tape to blankets is with a zig-zag stitch.  It insures that all layers are caught the first time around.  Every time I try use a straight stitch there are parts of the bias tape on the underside that do not get caught and I have to go back and fix several areas.  The zig-zag solved that problem for me.


Have you finished any long over-due projects lately?  I'd love to hear about them!

Tuesday, October 23, 2012

{Pajama Addict}

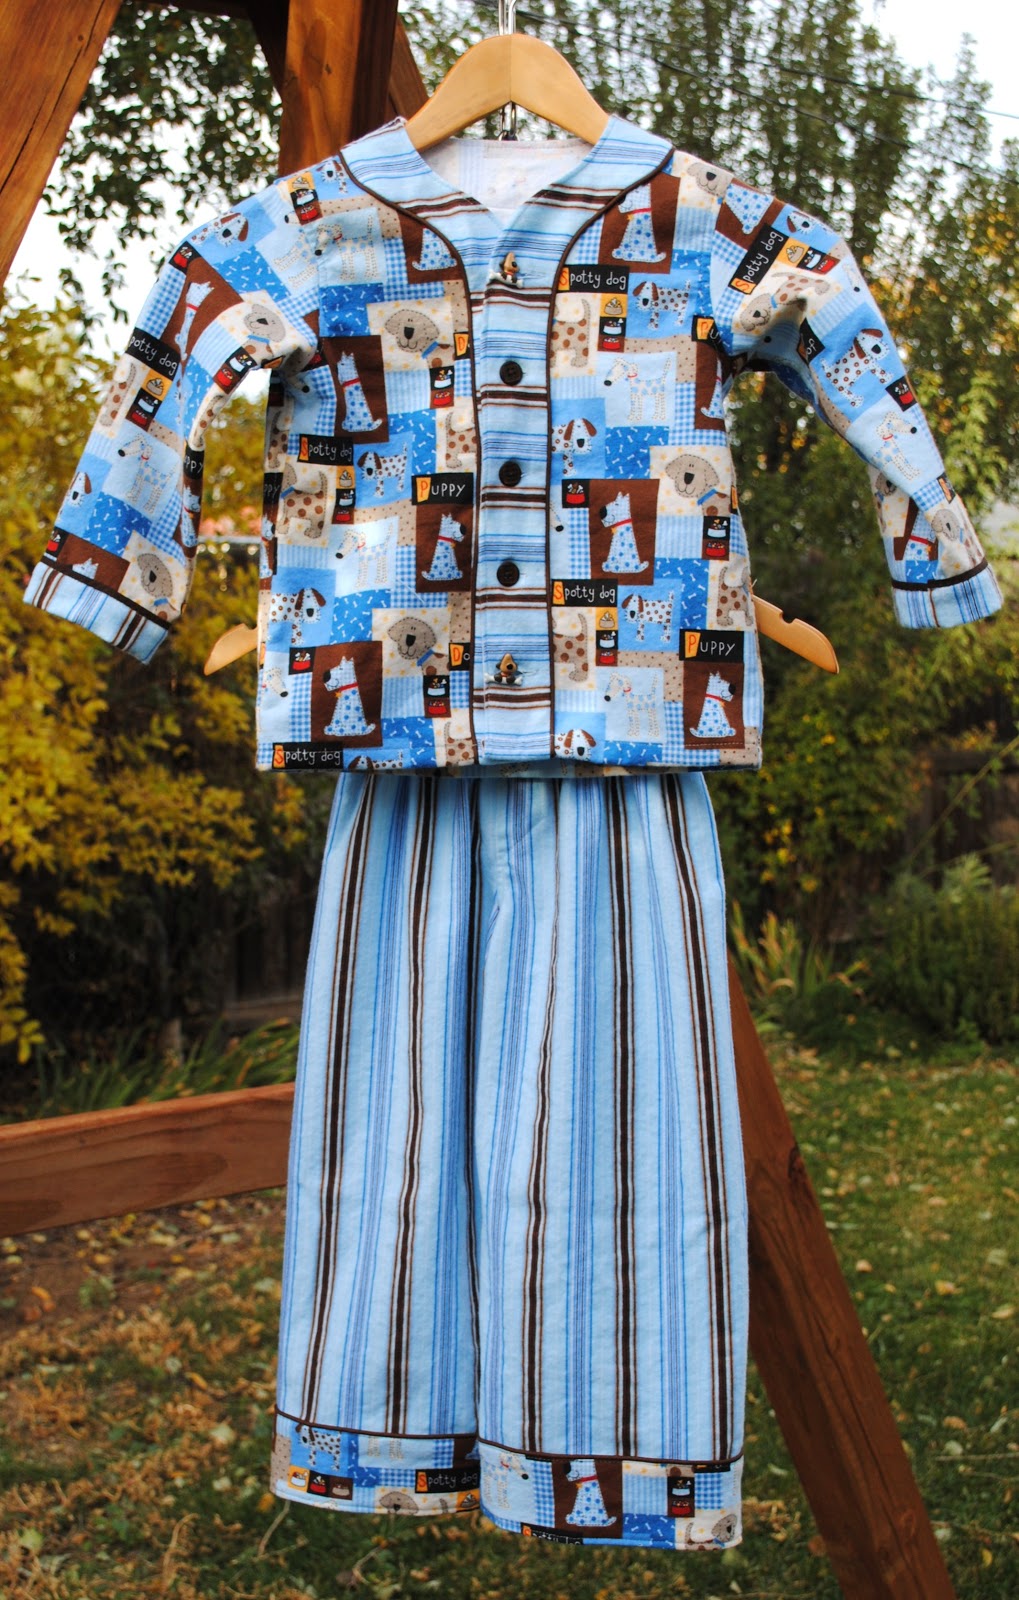
This month's pattern in the Sewing For Boys Sew-along at Boy, Oh Boy, Oh Boy is the Goodnight Sweetheart PJs.  To say I was excited was an understatement. I'm a pajama addict, I'll admit it.  For some reason I just love little kid pajamas.  Milo's pajama drawer is stuffed :0)  I had a great excuse for having so many pairs of pajamas for him for many years.  Milo's g-tube would leak a little at night from being rolled around on.  Every night his jammies would get dirty so he had to have a new pair every night.  Now that he isn't using it much anymore, it doesn't leak much but he still has lots of PJs.


The Goodnight Sweetheart PJs was the first pattern I made from the book when I got it about a year ago.  Using some adorable monkey flannel I dove right in making the pattern in size 2/3 without any modifications.  I learned a very important thing, wash flannel before you sew with it.  Flannel shrinks significantly.  I also realized (before washing the shirt) that I would need to add a few inches to the length of the shirt.  The pants were crazy wide as well on my skinny kid.  For my next attempt I made dinosaur flannel pajama pants to try to get a better fit.  Then I made race car pajama pants with a contrasting cuff.  For the second full set of pajamas I used some fun elephant fabric and coordinating stripes for the cuffs and facings.  In addition I added cuffs to the sleeves with a piping detail.  I added about 2 inches in length to the top as well which fit Milo much better.


This time I used 1 yard each of 2 coordinating flannels, pre-washed of course, again in size 2/3.  A brown and blue striped flannel was used for the pants with a puppy print flannel for the cuff.  I did make the cuffs differently than the pattern calls for.  I cut about 3 inches off the bottom of the pant leg and added the contrasting cuff with piping.  These cuffs can not be turned down but they are long enough he shouldn't outgrow them very fast.  I found that the cuffs on the other pants never layed right anyway and would become very wrinkled in the laundry. Milo has grown enough in the last year that the width of the original pattern fits perfectly.   For the shirt I used the puppy print with the stripes contrasting on the facing and the cuffs which were both done with the same piping detail as the pants cuff.  I did add 2 inches in lenght for proper fit.  Just for fun I added 2 puppy buttons the to shirt, one on top and one on the bottom.


I made some matching slippers to keep those toes warm on cold winter nights.

Monday, October 22, 2012

{Trousers}


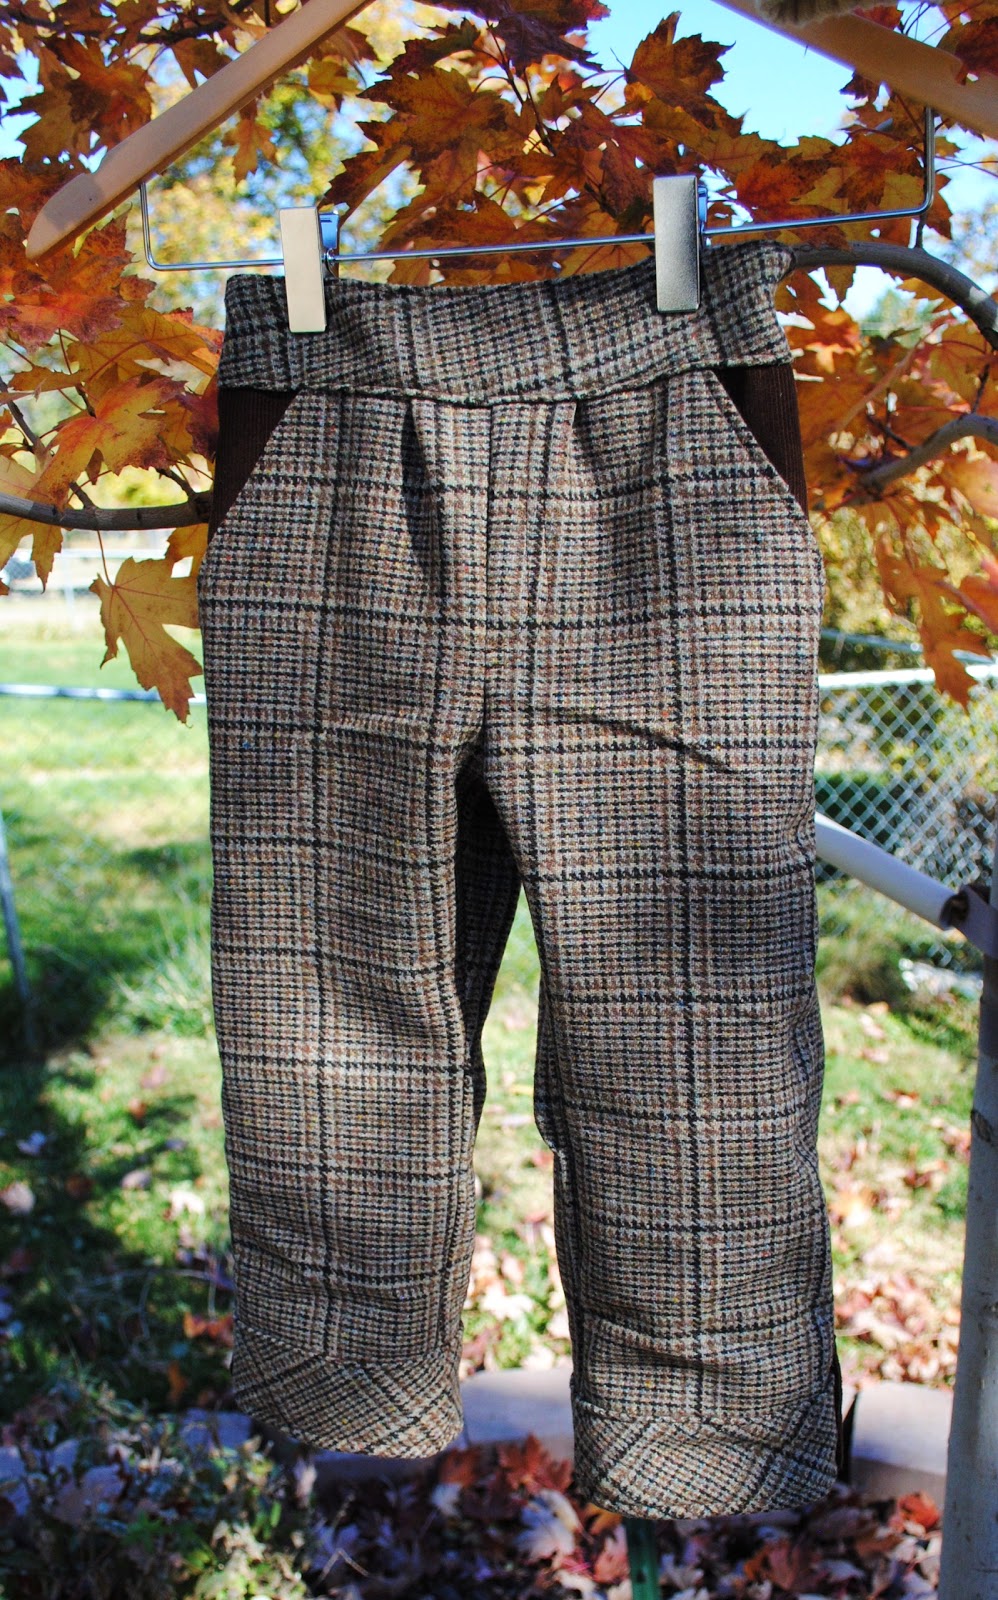
Still working on my overly ambitious list from Kids Clothes Week Challenge, I set out to make a pair of wool trousers for my son.  Then I realized that I had misplaced the knit fabric for the lining but I finally found the knit and got them finished!  I love how they turned out.  Perfect for our fall weather and Thanksgiving dinner with family.
 
Fabric: 100% wool in browns & cream plaid pattern; remnant from Jo-Ann's I've had for a year
Pattern: Little Heartbreaker Pants from the Sewing For Boy's Book
Construction & Modifications:  The pattern is great and the pants come together quite quickly.  I did take 2 inches out of the front and 2 inches out of the back to make them a more slim fit.  I lined them with a soft jersey knit in a cream color to add warmth and softness and so the wool wouldn't irritate my guys sensitive skin.  Lining these pants was a bit trickier than I expected. 
 
 
I layered the knit with the wool treating them as one piece then when finishing the seams I trimmed the wool to make sure it was enclosed in the knit.  I cut the waist facing pieces from the knit only which worked well.  One of the best parts of this pattern is how easy it is to make an adjustable waistband. 

 
The pocket lining was also knit and the pocket is made from brown corduroy.  I love the cuff detail in this pattern.  I had enough fabric that I could cut the cuffs on the bias to vary the pattern from the pant legs and I think they turned out great.  I added faux button tabs in brown corduroy on the side of the legs for a bit of extra detail.  I do like how they look but if I do it again I will make the tab wider. 
 
 
I looked through Milo's fall and winter clothes and found this lovely sweater that matches the pants perfectly.  I think he will look very smart and handsome come Thanksgiving Day!


Monday, October 15, 2012

{KCWC Days 5 & 6 ~~ Footie Pajamas}

On Days 5 & 6 I managed to sew for about 1 hour each day and finished off one pair of footie pajamas for my son.  I had hoped to make two pair but I guess it was not ment to be.


This is a pattern I drafted myself when I realized that he had grown out of all the knit footie pajamas I could find.  Due to his eczema footie pajamas work the best, year round, not to mention this kid won't sleep with a blanket covering him.  All of commercially available footie pajama patterns were just too wide so I realized I would have to make my own pattern, for the first time.  This pattern was a work in progress most of the summer with several improvements needed each time.  They are a bit big on him, nice and comfy, but so big they fall down off the ends of his feet when he walks. 


 I also made "hand covers" attached to the sleeves to help with the night time scratching, which seems to be the worst for him.  They are really just like the little mittens on newborn clothing :0)  His hands are free before bed time so he can play and read books.  At bedtime they are simply flipped over so he can not inflict damage on himself during the night.  They work great!

Hand Out, Hand Covered
Not the best picture but hopefully you get the idea.


Originally I used to knit (jersey or interlock) to make these since the weather was warmer.  I found some crazy soft microfleece and new they would make great winter pajamas.  I added a bright green zipper, rib knit collar and bias tape around the wrists.  I really like how the grey and green look together.
 
I hit a wall on Sunday and just couldn't make myself get to the sewing machine but after a day away I'm ready to take on one last project today, lined wool trousers...wish me luck!

Thursday, October 11, 2012

{KCWC day 4 ~~ Upcycled Hoodie}

I'm so excited that I finished my day 4 project before my son went to bed and it was even still light outside!  Today I made a zip front hoodie from a men's XL hooded sweatshirt and lined it with flannel from a men's XL work shirt.  The colors matched perfectly and the flannel gives it just a little more warmth for the cool morning and evenings this fall.
 

I had never upcycled a garment like this so it was kind of new territory but I loved it.  The flannel lining made it a bit more of a challenge but it all worked out.  I used a McCalls pattern to cut out the pieces.  I did leave the ribbing on the front, back and sleeves which made the construction go a bit faster and the result was still great.  I used the front pocket from the original sweatshirt so they didn't match up exactly but honestly you don't notice when he's wearing the jacket.  One thing I messed up on was cutting out the sleeves, I cut two left sleeves so had to do a little patching to get a right sleeve.  I didn't have enough material left to cut another one.  Fortunately the patch is barely noticeable and is hidden under the hood most of the time.  The hood I cut down from the original hood as well and was even able to use the metal grommets.  The biggest problem I had with the construction was the thickness of the seams.  Two layers of sweatshirt fleece plus two heavy layers of flannel was about all my serger was able to work with, add a layer for the pockets and the seam allowances were just too much for it to handle.  My sewing machine did a little better but was protesting by the end as well.
 
 
I added a little pocket with a freezer paper stenciled M on the sleeve just to give it a little personalization.  I already had a blue zipper so I thought the blue pocket tied it in nicely.  I also did some top stitching in the navy blue.  I did do a zig-zag stitch around the hood (in yellow) but the thickness caused the stitches to be uneven, if I had it to again I would have used a maroon thread for that so it wouldn't stand out so much.
 

Wednesday, October 10, 2012

{KCWC Day 2 & 3 ~~ Black Cats}

 
It's that time of year again, time to make Halloween costumes!  For the last 2 days I have been busy making black cat costumes for my nieces.  Last week I made two more black cats for a friend.  I feel like I have just produced a litter of black cats!  The fun part is that all 4 cats will probably go trick-or-treating together.
 
A Black Cat with Green Accents for the 3 year old.
 
 
A Black Cat with Pink Accents for the 8 year old.

 
For these costumes I used black panne fabric that I have had for many years and layered it with fleece.  The fleece layer was done for two reasons.  First for warmth, here in Colorado Halloween is usually pretty chilly if not down right cold.  Second was to give the costumes a bit more shape.  Panne is a very stretchy, soft and flowing fabric so the fleece gave it some body as well as made it easier to work with. 
 
The two I made last week and the pink cat are all the same size. I used an old pajama pattern (think 1996 Simplicity) for the pants and the top.  I did need take the top in quite a bit on the sides and then added the hood with ears.  The lining of the ears was done in satin.  I also added a pocket on the front to keep the hands extra warm.  The green cat was made the same way but I used different patterns. 
 
For the tail I used a jumbo chenille stem.  I found a 6 foot piece at my local Michael's and knew it would make perfect cat tails.  The big cats have 18 inch tails and the little cat has a 12 inch tail.  On one end I hot glued a piece of felt that I had put a button hole on.  The other end I covered with an approximately 5 inch tube of satin fabric and hot glued it in place.  The tail buttons right onto the seat of the pants.  
 
I completed the look with some cat paw gloves, satin ironed on to knit gloves with heat 'n bond then sealed the edges with fabric paint.  For the little one I made cat paws on mittens the same way.  All four cats have collars made from grosgrain ribbon with snap closure and a star shaped "tag" with their first initial embossed on it.  I origionally wanted to make the tags from gray or silver Sculpey to look like metal but someone had bought the store out of those colors but I found a great replacement, especially for Halloween, glow in the dark Sculpey.

Black Cat with Blue Accents and  Black Cat with Purple Accents
 

Now if my almost 6 year old son would just make up his mind about what he wants to be.  Every day he comes up with several different ideas :0)


Monday, October 8, 2012

{KCWC day 1 ~~ Slippers}

Fall has finally arrived in our neck of the woods and winter even snuck in for a few days this last weekend. It's time to keep those toes warm!  I decided to make slippers for my son without a pattern.  I did use this tutorial from Made By Rae as a starting point but changed the look quite a bit.  In the end, after lots of trial and error, I ended up with a decent pair of fleece cross-over slippers.

 
My original vision did not include the elastic around the ankle but they just would not stay on without it.  I tried just a bit in the back but that wasn't enough either.  I added 2 snaps to help with the fit as well.  I really liked the look of them without the elastic but they don't do much good if they won't stay on the feet :0)  Because the bottom was also fleece and we have slippery hardwood flooring I drew a design with fabric paint to help them become a non-slip sole.
 
Last year I bought some faux suede/sheepskin fabric with the intention of crafting some slippers but it never happened so I figured I would do it this year.  I did try but it was one big FAIL. 
 
 
Not only was it difficult to sew the uppers to the sole because there was NO stretch, my son hated the feel of them.  One slipper turned out alright but definitely needed some snaps.  I got Milo to try it on and he wouldn't even walk in it.  He hated it, sigh.  The other slipper was a disaster from the start.  The sole was totally puckered after trying to join it with the upper and I gave in.  If Milo wouldn't wear them anyway I was not going to stress over it.  After photographic evidence of the disaster was recorded, these guys ended up in the garbage!