Tuesday, October 22, 2013

Kids Clothes Week~~Fall 2013

I started my kids clothes week a bit early since I won't have much time to sew this week.  Tomorrow my son starts a two week intensive treatment program for his eczema which requires us to be at the hospital for about 10 hours a day.  In preparation for this I did make him several pairs of pajamas!  These will be used as part of the "wet wrap" technique they use at National Jewish Health to help heal the skin.  The pajamas needed to be cotton knit and snug fitting.  I had the perfect patterns in my arsenal to make the perfect jammies. 

For the shirt I used the Flashback Skinny Tee and for the bottoms I used Fancy Pants Leggings.  About a year ago I found some great monster knit fabric at Joann's and used that for one pair.  The other pair ended being one pair of bottoms and two tops.  For these jammies I used up the very end of the monster fabric, some grey knit I picked up as a remnant and some knit scraps I had.  The sleeves had to be pieced on both tops but I like how they turned out.  I also like my smaller left-over pile!   I also had some race car knit left over from making jammies once before (that are completely worn out).  I paired the race cars with some solid color knit I had in my stash to make this pair. 

 
Thumbs up for the new "cozy and soft" monster pajamas, he refused to take them off!  This pair has a contrasting black bum panel to match the cuffs.  I also used ribbing (with some spandex in it) for the waistband.  I wasn't sure how well they would stay up, but they work beautifully.
 
 
Two more shirts and a pair of bottoms that will mix and match with the monster jammies.  I really like how the two-tone sleeves came out and it allowed me to get two shirts done instead of just one.  I also used the black ribbing for the waist band. 


Race car pajamas to replace the pair he has worn out.  I love how the colors turned out on this pair.  The red top and navy blue bum panel and cuffs match this print perfectly.  For this pair I used some red elastic on the waist.
 

Wednesday, September 4, 2013

{Mitted Pajamas}

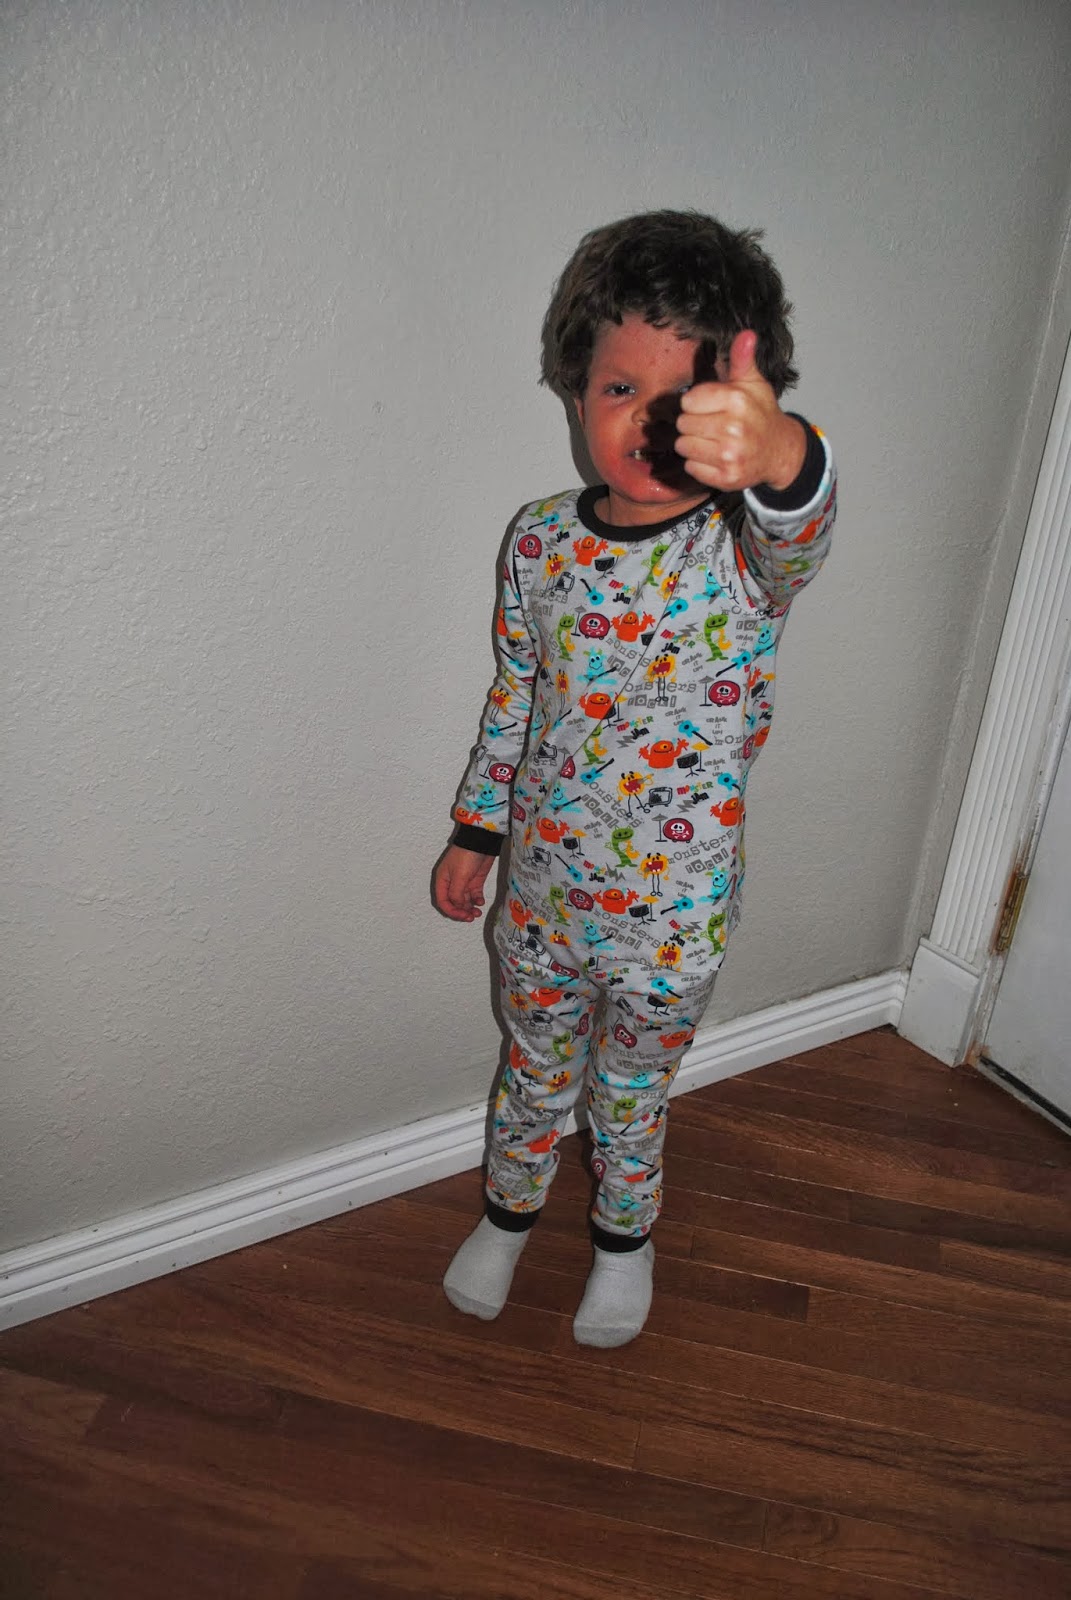
If you have a kid with eczema you know the nights are the worst for scratching.  Milo has had eczema since he was about 6 weeks old.  Some years have been better than others, but the last two years have been pretty difficult.  Night time is the hardest because he lays in bed with nothing to do until he falls asleep, so he scratches.  Footie pajamas prevented him from scratching most of his body.  His forearms where he could pull up his sleeves and his face were his main targets.  I thought to myself, he needs those newborn type pajamas with the fold-over mittens.  I realized he had a pair of footed pajamas that had the same type of thing on the feet.  I checked them out and figured out how to put the same thing on the sleeves of Milo's jammies to prevent the bloody sheets.  I figured out two ways of putting "hand covers", as Milo calls them, onto pajamas. 


The method I will show you here can be easily added to store bought pajamas with long sleeves.  The second method (in an upcoming post) requires you to make the whole shirt or pajamas.  Honestly my son can get his hands out of either of these if he really wants to.  He can also play with toys and unzip footie pajamas to use the bathroom in the night even with his hands still covered.  What these do is prevent the unconscious scratching during sleep and just before falling asleep he can scratch but his hands are covered so no damage is done.

Materials Needed:
pajamas--either 2 piece with long sleeves or footie pajamas work great
 

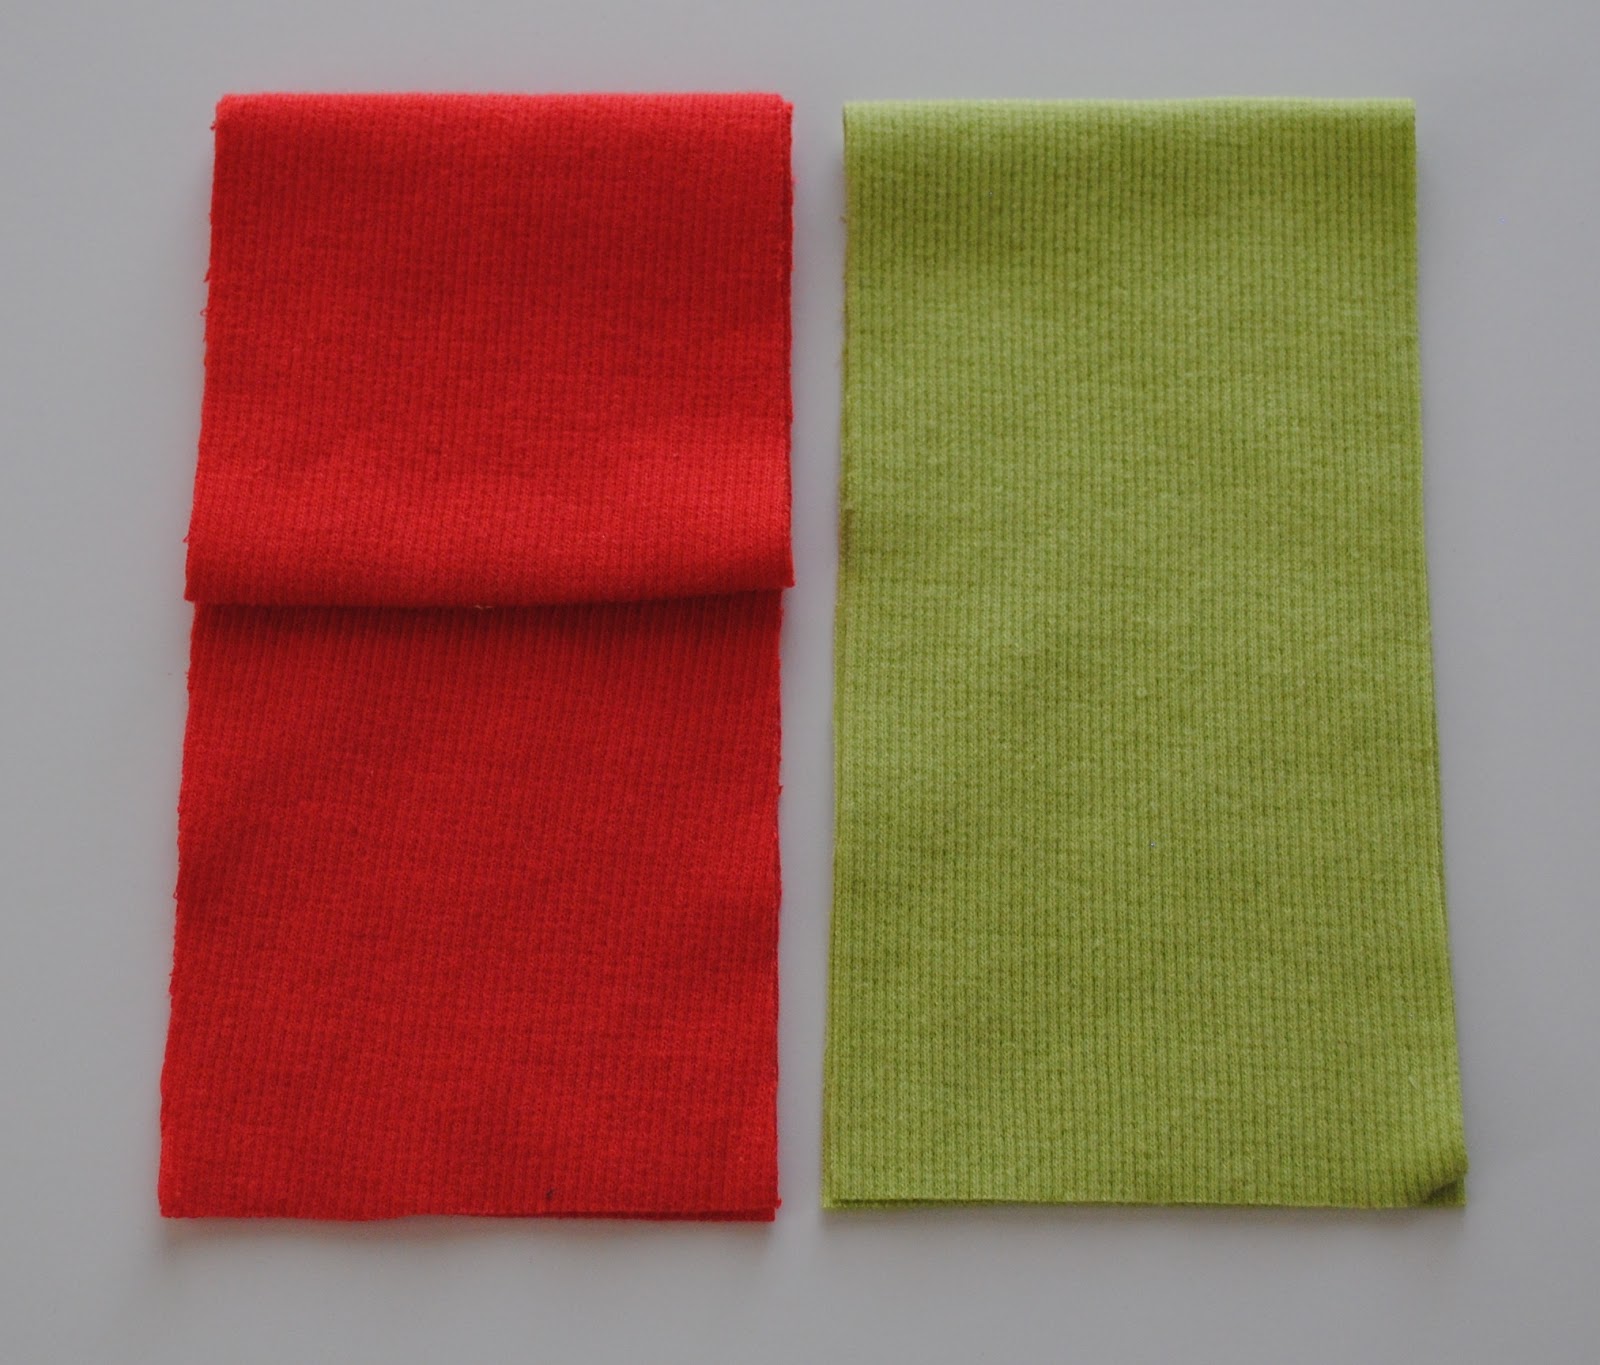
1/2-3/4 yard of ribbing in color of your choice.  Ribbing can be found in most fabric stores and on-line.  It is normally 95-97% cotton and 3-5% spandex to give it the stretchiness but not stay stretched out.  Ribbed knit can be found in 100% cotton but will stay stretched out until you wash it.  I have used both and they both work well for hand covers.  It can be hard to find a good color selection of ribbing.  I recently found women's ribbed tank tops on clearance and picked them up in several colors.  This is what I used in my example.  When cutting out your pieces make sure the lines run the long way on your pieces so it stretches the correct way. 
 

thread
scissors
sewing machine


Step 1:
Measure how wide the cuff is on the sleeve, add 1/2 inch. 


This is the width you will cut your pieces.  In my example, the cuff was 2 1/2 inches so the width I cut my pieces is 3 inches.

Step 2:
Measure how long you child's hand is then add 2 inches.  Double this number for the total length to cut these pieces. Cut 2 pieces of ribbing this length by the width in step 1.  In my example, Milo's hand is approximately 4 inches + 2 inches = 6 inches x 2 for a total of 12 inches.  These are the green pieces in the pictures.

Step 3:
Add 6 inches to the above number (12 in my example) and cut 2 pieces of ribbing this length by the width in step 1.  For my example I cut my pieces 18 inches by 3 inches.  These are the salmon colored pieces in the pictures.


Step 4:
Lay one piece from step 2 and one piece from step 3 next to each other, then fold them both in half.


Fold the longer piece down from the folded edge to make it the same length as the shorter piece.


Lay the shorter piece (green) on top of the other piece (salmon) so that the extra folded bit is in the middle. This extra bit is what will flip over to cover the hand.  Pin the long edges together and sew with a 1/4 inch seam allowance.


Step 5:
Trim your seam allowance to about 1/8 inch and turn your cuffs right side out.


Step 6:
Turn the pajama sleeve inside out.  Fold the existing cuff toward the inside.  Slip your new cuff into the sleeve.


I like to position the cuff with the extra part that folds over (salmon color) toward the front of the shirt. Match the side seam of the cuff to the sleeve seam and pin cuff to sleeve.


Step 7:
Sew the cuff to the pajama sleeve with a small 1/4 inch seam.


Turn the sleeve right side out.  Repeat steps 4-6 for the second sleeve with the other 2 pieces you cut in steps 2 and 3.

 Finished cuffs
Cuff folded over and  Cuff folded down for those times hands can be free to play

I added hand covers to 4 pair of pajamas in just over 30 minutes!


These hand covers would work great to keep hands warm in the winter and help prevent little fingers from pulling on trachs, feeding tubes, pulse ox probes and many other things!  They are not 100% fool proof but we love them :0)

Saturday, April 27, 2013

{Beach Pants}


After making the Beach Bum Hoodie I had just enough fabric left over to make a pair of pants.  Well, I almost had enough...I did have to piece one of the legs but I really like how it turned out.  The best part was that all of my fabric had been used, not one piece left to go back into the stash that has grown out of control!

I used the Kickin' Back Sweats pattern from the Sewing For Boys book.  These pants are nice and roomy so they can slip on over shorts if it gets chilly.  I have made these pants a few times and they come together so nice and quickly. 

I think the little details like trim & topstitching make the garment.  I had picked up a pair of orange shoe laces at some point and decided to use them as embelishments on these pants.  I added functional drawstrings at the ankles, a faux drawstring at the waist and I added a shoestring stripe to the pocket. 


The leg I pieced together. It ended up on the back of the leg.
 I think it is pretty subtle yet almost looks like I did it
on purpose.  The drawstring adds interest and function.


One thing I like to do, especially with kids clothes, is to put a tag in them so the kiddo doesn't put them on backward. I usually use a scrap of contrasting fabric tucked into the elastic casing on the waist band. Sometimes I will use a piece of coordinating ribbon or twill tape.
 
It's finally warming up here and I can't wait for the kiddo to try these out!

Thursday, April 25, 2013

{Robot Tee}


I had so much fun making this funky robot t-shirt!  I bought a basic t-shirt at Hobby Lobby and used knit scraps to create the robot.  His eyes are giant googly eyes left over from another project and his zipper mouth came from a pair of worn out kids jeans. I used Heat 'n Bond to attach the shapes then zig-zagged around the largest shapes.  Next time I will use Heat 'n Bond Lite though because the heavy duty stuff is a bit thick and stiff. 
 
 Not only is this shirt funky and fun, it is functional for my little boy as well.  The mouth was carefully placed and when unzipped it reveals Milo's g-tube!  It is much more convenient and age appropriate to access his tube this way rather than lifing his shirt up to eat.  Milo has had his tube since he was 2 months old, it has become so much a part of who he is, he is reluctant to have it removed.  After 6 years he is finally eating enough by mouth that we really don't use his tube anymore. 


Peek-a-button!  Milo's g-tube is a "button" style and looks a lot like the flap on a beach ball.  Mr. Robot is drinking through his "straw" which is the extension tube that attaches to Milo's button.

Milo modeling how he "eats" with his tube.
Weather or not your little guy has extra accessories, who can pass up such a fun robot shirt!

Wednesday, April 24, 2013

{Beach Bum}

 
It's been snowing here in Colorado so it's been a little hard to get into sewing for warmer weather!  My kiddo seems to have lots of summer clothes but I could not resist making him one fun outfit.  I found this great boardshort fabric at The Fabric Fairy, I found the t-shirt on clearance for $1, and had the perfect brown fabric already in my stash.  The pattern is the Beach Bum Hoodie and Board Shorts pattern by Figgy's.  I bought the pattern a couple of years ago but never got around to making them.  The pattern is still available on Etsy and Ebay. 
 
The Beach Bum Hoodie came together really well and I had it done in just over an hour of sewing time.  I had some dark brown fabric in my stash that was the perfect complement to the boardshort fabric.  I believe it is a type of guaze but thicker and has a pattern in the looser weave.  I made it in a size 4 and it fits just right.  The hood is constructed differently than I have ever done but it lays well and fits around his head nicely.  The contrast shoulder pieces were easy to assemble.  Attaching the hood and the facing was really very straight forward as well.  The only problems I ran into were related to my fabric choices.  The board shorts fabric is very slippery and the brown had a little stretch to it.
 
The Board Shorts are a size 4 and also fit well.  The side pockets on the shorts were a little bit of a challange at first, the second pocket was much easier.  There is a tutorial on line HERE that helps with the construction.  Boardshort fabric is a little more difficult to work with because it is slippery, frays easily, and doesn't hold a pressed crease very well.  I used lots of pins which especially helped with heming and making the elastic casing at the waistband.
 
I scored the t-shirt on clearance for $1 and couldn't have matched any better.  I added a graphic using a freezer paper stencil and fabric paint.  I searched for a surf board picture on the internet then added my son's name to the middle surf board for a little personalization.  The shirt had long sleeves so I just cut them off to turn it into a short sleeved t-shirt. 


I am very pleased how this outfit turned out and can't wait for some warmer weather!


Tuesday, March 12, 2013

{Sight Words~~Easter Egg Edition}

 
 I discovered a fun way to help my Kindergardener learn his sight words!  He loves to play with the plastic Easter eggs so I combined the eggs with his sight words.  I choose to focus on 6 words at a time and used 12 eggs so that each word appeared twice.  I cut small pieces of paper and wrote his words on them to put in each egg.  Ideally I would have liked to use 12 of the same color eggs bust since each package has only 2 of each color that would have made for a whole lot of extra eggs so I settled on 6 each of two different colors.  I placed the eggs in basket for Milo to choose eggs from and a basket for him to put them in when he correctly read the word in each egg.  If he missed the word it would go back in the egg and into my basket to try again.  Origionally I used the left over eggs from last year but my son is pretty sneaky.  If he missed a word and the egg went back into my basket he would pick it again right away remembering what the word was without even looking at the written word.  This is why I wanted all the same color eggs.  Using two colors I figured out that he would choose all the green eggs and then all the orange eggs so I made sure one set of each word was in the green eggs and one was in the orange eggs.  I felt this way he was learning the words more effectively rather than guessing at them.
 

When I feel he has mastered a word I remove that word from the eggs and add in another word from his list.  So far he has been learning and retaining at least one word a day.  The best part is this last week he achieved reading at grade level for the first time this year.  Quite an accomplishment for my guy, I am so proud of him!

sorry for the bad cell phone pic

Monday, March 11, 2013

{Bicycle Boy}

In Januray I made a reversable jacket as the last challange in the Sewing For Boys Sew Along.  I had planned on making matching pants and shirt it just took me longer than I expected.  I finally finished them!
 

The t-shirt is based on Rae's Flashback Skinny Tee with short sleeves.  I added a band of fabric across the shoulder seams which matches the jacket.  I saw this detail on a men's shirt and loved it.  Next time I will use a smaller print though.  I also freezer paper stenciled a large bicycle on the front of the shirt.


The pants are based on Dana's Kid Pants with a few modifications.  I added re-inforced knees, front pockets, back pockets and an adjustable waistband.  My fabric was about 3 inches too short to cut out the back pants pieces so I added an extra section to each back leg piece and I really like how it turned out.  I used a black denim from Jo-Ann's as well as a back checked cotton for the pocket linings and waistband facing.  The top-stitching was done in a medium gray and I added two gray snaps on the front of the waistband too. 

 I just love how the whole outfit turned out.  The pants and jacket are about a 4/5 and the shirt is a 5 so he has room to grow into them.  The pants are too long right now but by next fall they should be perfect.


Sunday, March 10, 2013

{Bunny Tail}


A bunny costume for my imaginative kiddo.
 
 
Milo loves to pretend to be different characters and animals. As soon as Valentine's Day was over he was asking for his bunny ears. A few days later I did get them out for him, you can find the same ears at Target or Michael's. Sitting on my sewing table was a skein of yarn I used for decorating Christmas presents and knew it would make a fabulously fluffy bunny tail.
 
 
The yarn line is called Buttercup by Red Heart.  It comes in several baby colors.  I found it at Jo-Ann's and used a coupon to make it more cost effective for crafting.
 
Pom-poms are pretty easy to make, here's a tutorial for making pom-poms if you have never made one.  I made my pom-pom about 4 inches across.  If you use this same yarn I did you will need to find a stronger string to tie the center knot tightly.  Remember to leave the tails long so you can attach the mitten clip with a simple knot.
 
 
If one has a tail and ears, a bunny face t-shirt is a must!  I used a black fabric marker to draw a simple bunny face.  After the face was drawn a quick heat set with an iron and it was finished in about 5 minutes.
 

My little Easter Bunny is ready for some Easter Egg fun.  He loves to hide them for me to find, he's getting pretty creative with hiding spots too.  Only 4 more weeks before the big day...


Tip: make sure you remove the bunny tail from jeans before washing.  The original tail made it's way into the washing machine.  It ended up full of lint and the yarn matted a little bit.