Tuesday, March 12, 2013

{Sight Words~~Easter Egg Edition}

 
 I discovered a fun way to help my Kindergardener learn his sight words!  He loves to play with the plastic Easter eggs so I combined the eggs with his sight words.  I choose to focus on 6 words at a time and used 12 eggs so that each word appeared twice.  I cut small pieces of paper and wrote his words on them to put in each egg.  Ideally I would have liked to use 12 of the same color eggs bust since each package has only 2 of each color that would have made for a whole lot of extra eggs so I settled on 6 each of two different colors.  I placed the eggs in basket for Milo to choose eggs from and a basket for him to put them in when he correctly read the word in each egg.  If he missed the word it would go back in the egg and into my basket to try again.  Origionally I used the left over eggs from last year but my son is pretty sneaky.  If he missed a word and the egg went back into my basket he would pick it again right away remembering what the word was without even looking at the written word.  This is why I wanted all the same color eggs.  Using two colors I figured out that he would choose all the green eggs and then all the orange eggs so I made sure one set of each word was in the green eggs and one was in the orange eggs.  I felt this way he was learning the words more effectively rather than guessing at them.
 

When I feel he has mastered a word I remove that word from the eggs and add in another word from his list.  So far he has been learning and retaining at least one word a day.  The best part is this last week he achieved reading at grade level for the first time this year.  Quite an accomplishment for my guy, I am so proud of him!

sorry for the bad cell phone pic

Monday, March 11, 2013

{Bicycle Boy}

In Januray I made a reversable jacket as the last challange in the Sewing For Boys Sew Along.  I had planned on making matching pants and shirt it just took me longer than I expected.  I finally finished them!
 

The t-shirt is based on Rae's Flashback Skinny Tee with short sleeves.  I added a band of fabric across the shoulder seams which matches the jacket.  I saw this detail on a men's shirt and loved it.  Next time I will use a smaller print though.  I also freezer paper stenciled a large bicycle on the front of the shirt.


The pants are based on Dana's Kid Pants with a few modifications.  I added re-inforced knees, front pockets, back pockets and an adjustable waistband.  My fabric was about 3 inches too short to cut out the back pants pieces so I added an extra section to each back leg piece and I really like how it turned out.  I used a black denim from Jo-Ann's as well as a back checked cotton for the pocket linings and waistband facing.  The top-stitching was done in a medium gray and I added two gray snaps on the front of the waistband too. 

 I just love how the whole outfit turned out.  The pants and jacket are about a 4/5 and the shirt is a 5 so he has room to grow into them.  The pants are too long right now but by next fall they should be perfect.


Sunday, March 10, 2013

{Bunny Tail}


A bunny costume for my imaginative kiddo.
 
 
Milo loves to pretend to be different characters and animals. As soon as Valentine's Day was over he was asking for his bunny ears. A few days later I did get them out for him, you can find the same ears at Target or Michael's. Sitting on my sewing table was a skein of yarn I used for decorating Christmas presents and knew it would make a fabulously fluffy bunny tail.
 
 
The yarn line is called Buttercup by Red Heart.  It comes in several baby colors.  I found it at Jo-Ann's and used a coupon to make it more cost effective for crafting.
 
Pom-poms are pretty easy to make, here's a tutorial for making pom-poms if you have never made one.  I made my pom-pom about 4 inches across.  If you use this same yarn I did you will need to find a stronger string to tie the center knot tightly.  Remember to leave the tails long so you can attach the mitten clip with a simple knot.
 
 
If one has a tail and ears, a bunny face t-shirt is a must!  I used a black fabric marker to draw a simple bunny face.  After the face was drawn a quick heat set with an iron and it was finished in about 5 minutes.
 

My little Easter Bunny is ready for some Easter Egg fun.  He loves to hide them for me to find, he's getting pretty creative with hiding spots too.  Only 4 more weeks before the big day...


Tip: make sure you remove the bunny tail from jeans before washing.  The original tail made it's way into the washing machine.  It ended up full of lint and the yarn matted a little bit.
 

Sunday, February 10, 2013

{Sewing For Boys Sew Along~~Wrap-Up}

I can hardly believe that it has been a whole year of Sewing For Boys!  I participated in 10 of the 12 months, May and November were just too busy to get sewimg accomplished.  I really enjoyed the challanges of learning new techniques and the opportunity to sew items I might not have tried before.  Stacey at Boy, Oh Boy, Oh Boy Crafts did a wonderful job hosting this sew along and providing us with great prizes each month.  I was fortunate to win a beautiful bag that she made.  I have already used it many times. Thank You so much for this great year long sewing-fest.
 

Raw Edge Raglan Tee (January 2012) -- I conquered sewing with lycra/spandex & tried my hand at reverse applique.

Kickin' Back Sweats (February) -- Used French Seams and top-stitching seam allowances flat for a more finished look and comfortable fit.

Easy Linen Shirt (March) -- Tried the Turn and Stitch method of finishing the seams in conjuction with hem facings on the bottom and sleeve cuffs.  Added topstitching to give it a little more interesting look

Treasure Pocket Pants (April) -- Again used French Seams to finish these pants.  Also used microfleece to make applique on pant leg and the seat of the pants.

Henry Shirt (June) -- Learned how to attach yoke/sleeve piece that was cut on the bias.  It was a bit tricky but turned out great.

Heartbreaker Pants (July) -- First time making pants with adjustable elastic in the back of the waistband.

Luka Hoodie (August) --  I decided to add a zipper instead of buttons to the front closure and that was a challange.  I also added an elastic cord at the waist band.  Loved how the secret pocket was made.

Pauley's Pullover (September) -- Attaching a v-neck binding.  So much easier than the scrubs I used to make with a v-neck.

Goodnight Sweetheart Pajamas (October) --  The pattern I have made the most.  Jammies that are so comfortable and so cute.  I added cuffs to the pants and the shirt sleeves in a coordinating fabric.

2 In 1 Jacket (December 2012/January 2013) -- First time attemping welt pockets.  I need to practice this some more.
 
Check out the Sewing For Boys Sew Along Flickr Group to see all the wonderful boy clothes that the participants sewed over the last year.  There are some great things there!

Sunday, February 3, 2013

{Melted Crayon Laundry Disaster}

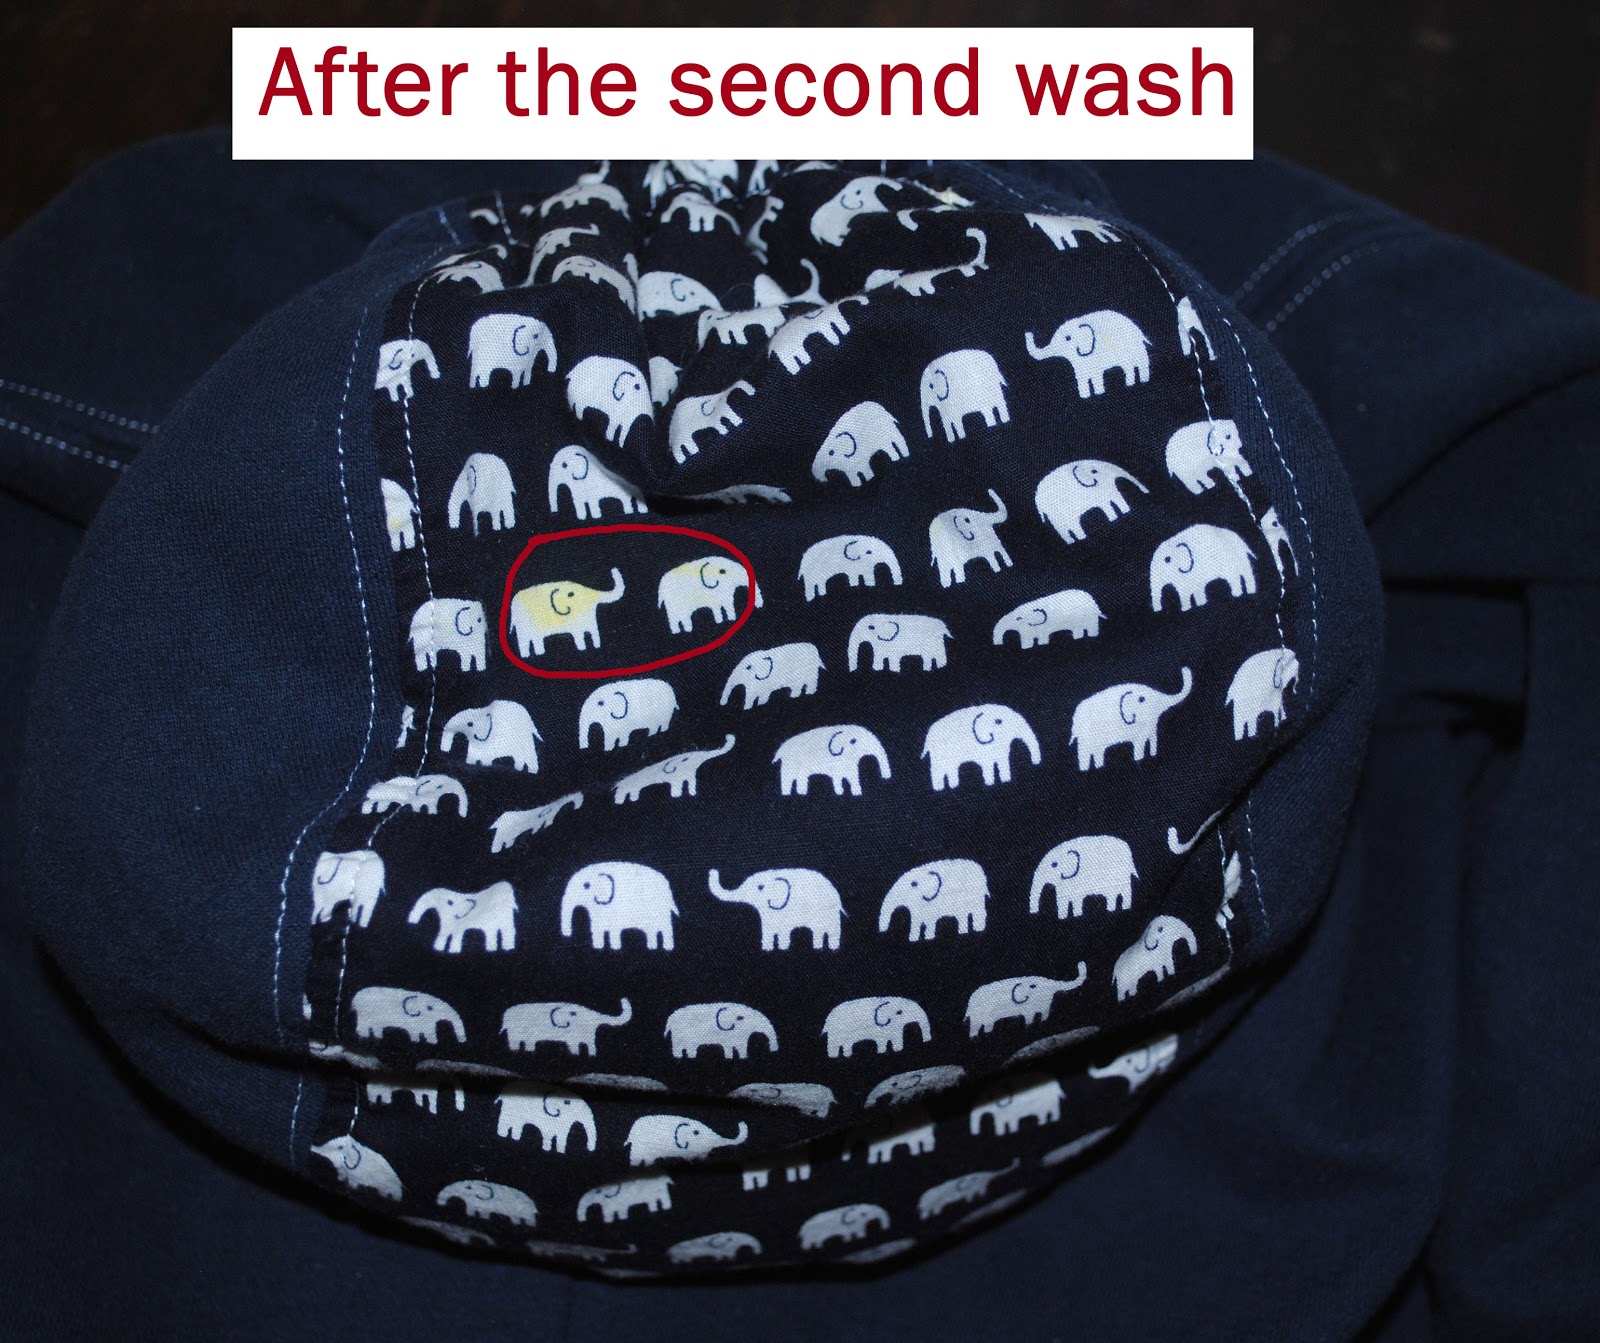
Laundry disaster!  I forgot to check the secret pocket on his hoodie and a yellow crayon made it through the washer and the dryer.  The only 2 pieces of clothes in the entire load that got yellow crayon melted on was his elephant hoodie that I made for him and a pair of jeans.  The hoodie got it the worst, by far.  Mostly on the hood, but quite a bit of it.

 
I had no idea how to remove this much melted crayon from clothes so it sat in the laundry area for months.  I finally decided to tackle my problem so where did I start?  Google of course!  I came across a blog that sung the praises of LA's Totally Awesome so I gave it a go.  I found this stain remover at Family Dollar for only $1 a bottle. 
 
 
She said to put the clothing in the wash on the hottest, longest setting and add half the bottle.  I also pre-treated the spots with a bit of the stain remover as well.  No scrubbing, no elbow grease required.


 After the first wash quite a bit of the crayon was gone and what was left seemed to have balled up on the surface of the fabric.  I scraped off what I could with my fingernail and sent it through the wash again.  I pre-treated the spots and added about a 1/3 cup of the stain remover.


After the second wash all that is left is a faint yellow spot on the top of the hood.  The spot on the inside of the hood is gone as is the spot on the solid part of the hood.  I am hopeful that the remaining spot will fade more when washed again.  To say I am releaved that this hoodie was saved is an understatement.  It is one of my favorite things that I have made for him.  In fact I'm working on a pair of matching sweatpants.

I would have to say that LA's Totally Awesome has definately lived up to it's name!

Friday, February 1, 2013

{Train Bedroom~~Reveal}

I set out to transform my son's toddler room into a bedroom that can grow with him.  He loves trains but soon will be out of the Thomas, Chuggington & Dinosaur Train themes.  His new bedroom is a train room that he will fit him for many years.  Thomas did sneak in a few places but nothing that can't be removed or replaced when the times come.  Without further ado...
 
Rail Road crossing sign on his bedroom door was found on Amazon and was a Christmas gift from Grandma.
 
The view from the door.  The bedspread is the Alina beadspread from Ikea.   The orange pillow is a body pillow and ribbed cover from Target.  The light grey pillowcases are from Wal*Mart.  A bit of Thomas made it into the room with a mini pillow pet and a fleece blanket.  Details on the curtain can be found here, and the photographs here.
 
 
 This is the wall to the left of the door.  Behind the door to the hall is the vintage inspired train schedule.  The closet door has a railroad crossing sign and gate.  The rail road spike coat rack and a trio of train canvas panels finished off this wall.
 
 
On the dresser is a large metal distressed M and a tin steam engine, both from Hobby Lobby.  The lamp is from his old room, I'm still searching for just the right lamp.
 
 
The adjacent wall has a large window covered with a train themed curtain held up with a rail road track curtain rod.

 
The next wall has the orange stripe with a grouping of 10 rail road related photographs.

 
The final wall is the smallest but ended up with the most going on.  The low dresser and stuffed animal cargo box set along this wall beside the door.  Above the box are 2 shelves from Ikea (Fabian wall shelf) which hold special stuffed animals, an elephant poster from our zoo and 1 more train photograph.  Above the lower shelf is a cork board to hold treasures.  Beside the shelves is the Subway Art and then the final railroad spike hat rack adorned with a bandana, train hat and train whistle.


It was a lot of fun (and work) to put this room together for my growing boy.  I revealed it to him on his 6th birthday when he got home from school.  I was a little worried about making so many changes to him room at once.  He isn't very good with change, so I painted the walls in October so he had a while to get used to idea.  He saw other elements in various stages of construction and I'm sure that helped as well.  His reaction was priceless, he LOVES his new train room.  For several days he would say "I love my new train bedroom, Thank You!" out of the blue.  There is no better thanks than that.


Wednesday, January 30, 2013

{Train Bedroom~~Railroad Art}

There are 3 major art projects in the train bedroom.  A grouping of photographs, a trio of hand painted canvases & a large subway art piece.

Photographs
Across the orange stripe I painted on one wall I placed 10 photographs.  Each photo is 8x10 in a thin black frame I found at Wal*Mart for only $2 each.  The photos are pictures I took of train related items from a photo shoot I did with my son.  Most of the photos can be seen in the A Boy and His Train post.  I hung them with Command Picture Hanging Strips so they are securely attached to the wall and have less of a risk of falling off during the rambunctious boy activies that may occur in the room.

Canvases
While searching for inspiration for the train bedroom I came across a print on Etsy the I loved but it was small and there was only one.  I new I needed something similar but more so I set out to create a set of 3 canvas panels. 

I decided on yellow, blue and green for the background colors and grey for the trains.  I searched for free train images and settled on 3 different types of trains; a bullet train, a steam engine and a disel train.  I created freezer paper stencils of each one cutting out all the small areas with an exacto knife.  I had hoped that the freezer paper would iron onto the canvases but it didn't so I taped it down the best I could.  The paint did leak under the stencil in many places so I had to touch it up with the base color paint.  It was a tedious process but the results are great.  These 3 pieces fit the space perfect.


Subway art
I created a piece of subway art using Photoshop Elements.  I placed a picture of Milo that I had taken in the center and surrounded it with various train/railroad terms in various sizes.  I used 2 different fonts and 2 different colors of grey for the words.  The boarder around the picture is a navy blue to match the picture.  I had the piece printed at Costco as a 20x30 print.  I had a poster frame that was in Milo's room already to I decided to use it again.  It was bigger than the print so I found some great yellow paper at Hobby Lobby in their art department that I used as a backing.


The final reveal is coming soon, check back soon!