Sunday, February 3, 2013

{Melted Crayon Laundry Disaster}

Laundry disaster!  I forgot to check the secret pocket on his hoodie and a yellow crayon made it through the washer and the dryer.  The only 2 pieces of clothes in the entire load that got yellow crayon melted on was his elephant hoodie that I made for him and a pair of jeans.  The hoodie got it the worst, by far.  Mostly on the hood, but quite a bit of it.

 
I had no idea how to remove this much melted crayon from clothes so it sat in the laundry area for months.  I finally decided to tackle my problem so where did I start?  Google of course!  I came across a blog that sung the praises of LA's Totally Awesome so I gave it a go.  I found this stain remover at Family Dollar for only $1 a bottle. 
 
 
She said to put the clothing in the wash on the hottest, longest setting and add half the bottle.  I also pre-treated the spots with a bit of the stain remover as well.  No scrubbing, no elbow grease required.


 After the first wash quite a bit of the crayon was gone and what was left seemed to have balled up on the surface of the fabric.  I scraped off what I could with my fingernail and sent it through the wash again.  I pre-treated the spots and added about a 1/3 cup of the stain remover.
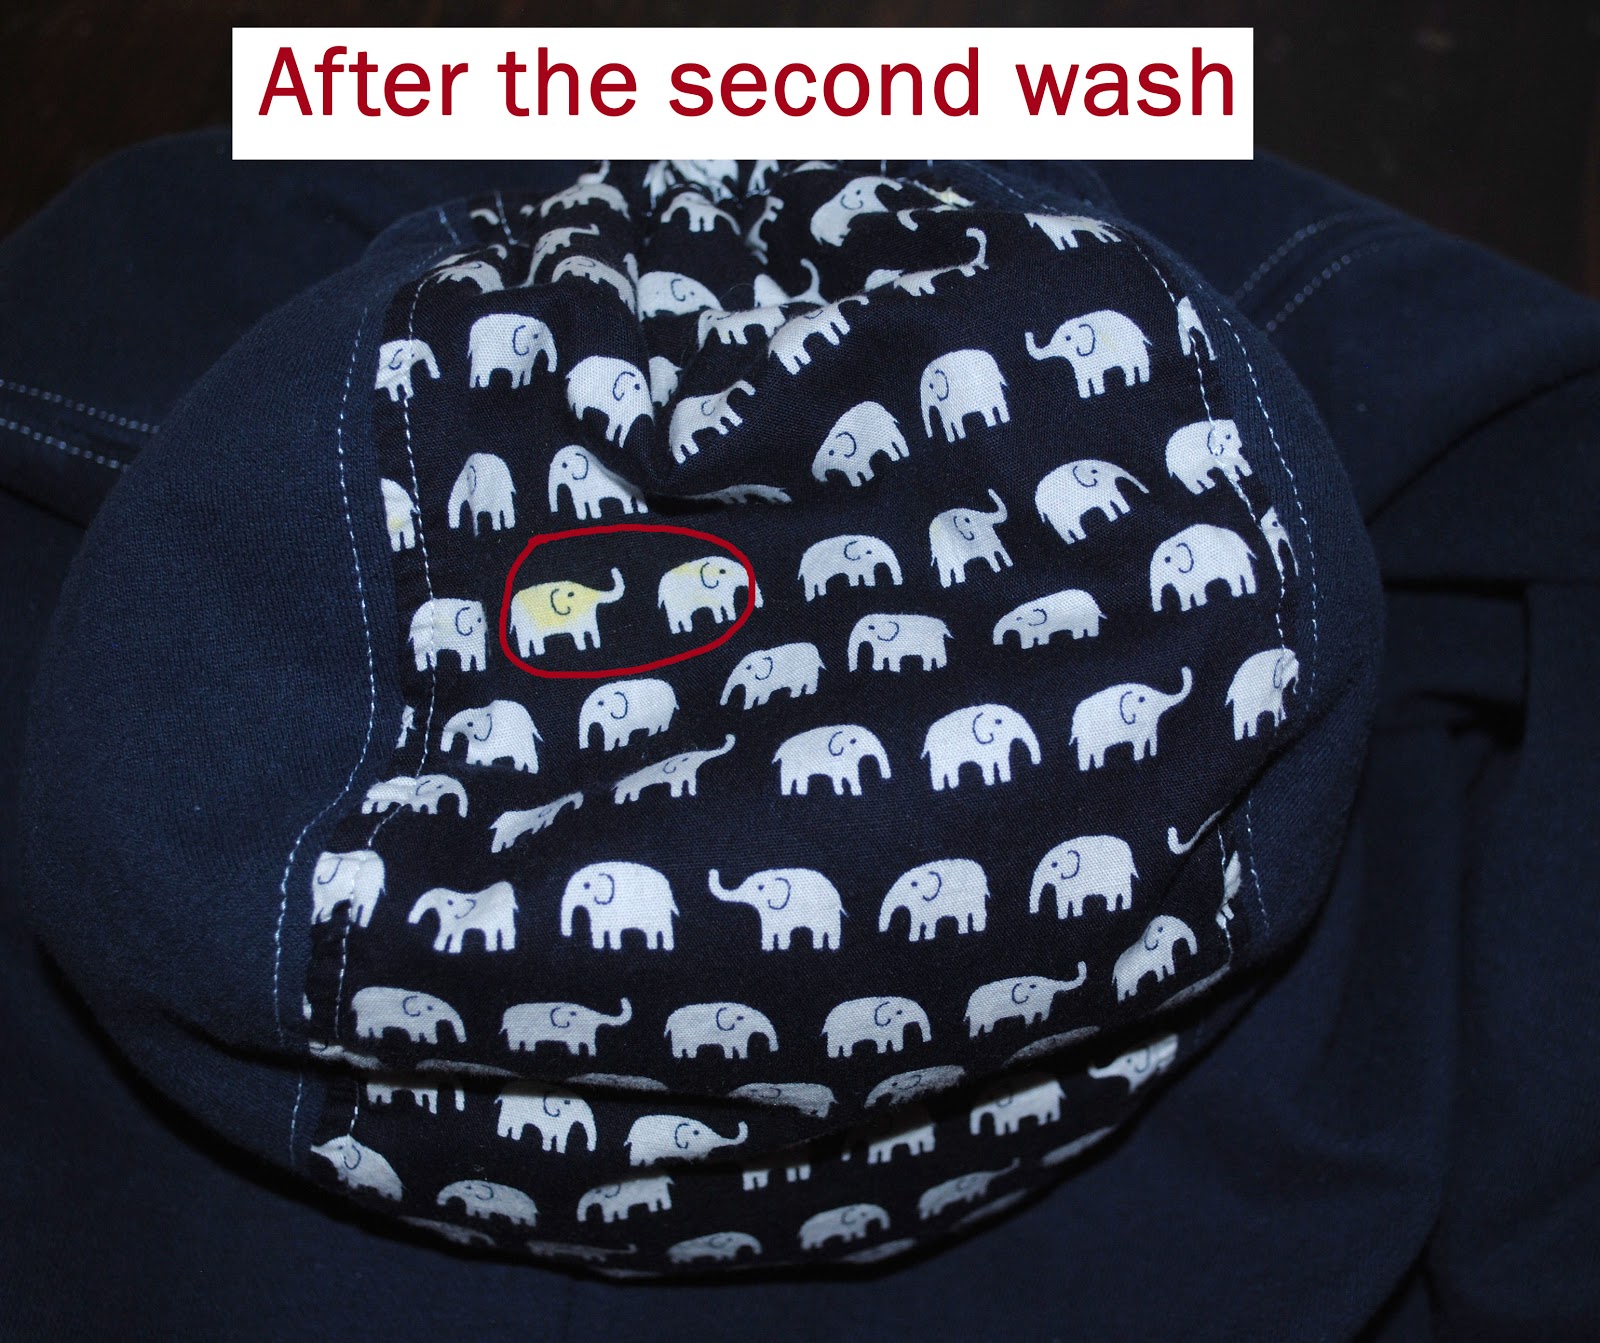

After the second wash all that is left is a faint yellow spot on the top of the hood.  The spot on the inside of the hood is gone as is the spot on the solid part of the hood.  I am hopeful that the remaining spot will fade more when washed again.  To say I am releaved that this hoodie was saved is an understatement.  It is one of my favorite things that I have made for him.  In fact I'm working on a pair of matching sweatpants.

I would have to say that LA's Totally Awesome has definately lived up to it's name!

Friday, February 1, 2013

{Train Bedroom~~Reveal}

I set out to transform my son's toddler room into a bedroom that can grow with him.  He loves trains but soon will be out of the Thomas, Chuggington & Dinosaur Train themes.  His new bedroom is a train room that he will fit him for many years.  Thomas did sneak in a few places but nothing that can't be removed or replaced when the times come.  Without further ado...
 
Rail Road crossing sign on his bedroom door was found on Amazon and was a Christmas gift from Grandma.
 
The view from the door.  The bedspread is the Alina beadspread from Ikea.   The orange pillow is a body pillow and ribbed cover from Target.  The light grey pillowcases are from Wal*Mart.  A bit of Thomas made it into the room with a mini pillow pet and a fleece blanket.  Details on the curtain can be found here, and the photographs here.
 
 
 This is the wall to the left of the door.  Behind the door to the hall is the vintage inspired train schedule.  The closet door has a railroad crossing sign and gate.  The rail road spike coat rack and a trio of train canvas panels finished off this wall.
 
 
On the dresser is a large metal distressed M and a tin steam engine, both from Hobby Lobby.  The lamp is from his old room, I'm still searching for just the right lamp.
 
 
The adjacent wall has a large window covered with a train themed curtain held up with a rail road track curtain rod.

 
The next wall has the orange stripe with a grouping of 10 rail road related photographs.

 
The final wall is the smallest but ended up with the most going on.  The low dresser and stuffed animal cargo box set along this wall beside the door.  Above the box are 2 shelves from Ikea (Fabian wall shelf) which hold special stuffed animals, an elephant poster from our zoo and 1 more train photograph.  Above the lower shelf is a cork board to hold treasures.  Beside the shelves is the Subway Art and then the final railroad spike hat rack adorned with a bandana, train hat and train whistle.


It was a lot of fun (and work) to put this room together for my growing boy.  I revealed it to him on his 6th birthday when he got home from school.  I was a little worried about making so many changes to him room at once.  He isn't very good with change, so I painted the walls in October so he had a while to get used to idea.  He saw other elements in various stages of construction and I'm sure that helped as well.  His reaction was priceless, he LOVES his new train room.  For several days he would say "I love my new train bedroom, Thank You!" out of the blue.  There is no better thanks than that.


Wednesday, January 30, 2013

{Train Bedroom~~Railroad Art}

There are 3 major art projects in the train bedroom.  A grouping of photographs, a trio of hand painted canvases & a large subway art piece.

Photographs
Across the orange stripe I painted on one wall I placed 10 photographs.  Each photo is 8x10 in a thin black frame I found at Wal*Mart for only $2 each.  The photos are pictures I took of train related items from a photo shoot I did with my son.  Most of the photos can be seen in the A Boy and His Train post.  I hung them with Command Picture Hanging Strips so they are securely attached to the wall and have less of a risk of falling off during the rambunctious boy activies that may occur in the room.

Canvases
While searching for inspiration for the train bedroom I came across a print on Etsy the I loved but it was small and there was only one.  I new I needed something similar but more so I set out to create a set of 3 canvas panels. 

I decided on yellow, blue and green for the background colors and grey for the trains.  I searched for free train images and settled on 3 different types of trains; a bullet train, a steam engine and a disel train.  I created freezer paper stencils of each one cutting out all the small areas with an exacto knife.  I had hoped that the freezer paper would iron onto the canvases but it didn't so I taped it down the best I could.  The paint did leak under the stencil in many places so I had to touch it up with the base color paint.  It was a tedious process but the results are great.  These 3 pieces fit the space perfect.


Subway art
I created a piece of subway art using Photoshop Elements.  I placed a picture of Milo that I had taken in the center and surrounded it with various train/railroad terms in various sizes.  I used 2 different fonts and 2 different colors of grey for the words.  The boarder around the picture is a navy blue to match the picture.  I had the piece printed at Costco as a 20x30 print.  I had a poster frame that was in Milo's room already to I decided to use it again.  It was bigger than the print so I found some great yellow paper at Hobby Lobby in their art department that I used as a backing.


The final reveal is coming soon, check back soon!

Monday, January 28, 2013

{Train Bedroom~~Curtains}

I found a picture of a train bedroom that had a train track on one of the walls and just loved it, you can see it here.  I knew that we didn't have enough wall space for that but I was determined to somehow work a track into the room.  I came up with a railroad track curtain rod.

For the rail road ties I used the ends of cedar fence pickets that were left over from the Cargo Box project.  For the rail I found an 8 foot piece of square aluminum pipe at Home Depot.  I attached the pickets to the wall with Command Picture Hanging Strips (I stapeled them to the wood) and the pipe is attached using a corner bracket.

 
The curtain is a tab back curtain.  The main part of the curtain is a dark grey curtain pannel I found at Ikea in their markdown section.  I wanted to use a duck cloth but could not find it in any shade of grey.  The curtain I found has a similar texture and it was cheaper, bonus!    To keeps the light (and the cold) out it is lined with black out fabric from Joann Fabrics.  The stripes on the ends are 6 inches wide.  I found this great railroad sign fabric on Fabric.com but when I went to order it (and needed it soon) it was temporarily out of stock.  I searched all the local fabric/quilting shops and no luck.  Someone told me to try equilter.com and they had it. The name of it is:  Timeless Treasures Planes, Trains & Automobiles Train Signs Black and can be found here and here.

 
Milo's room stays nice and dark in the mornings, now if he would just sleep a little later on the weekends...

Saturday, January 26, 2013

{Train Bedroom~~Cargo Box}

My son loves his stuffed animals and I swear the things multiply on their own!  I found these stacking bins to corral the animals (and trust me they are stuffed in there tight) but when Milo went looking for a specific animal they all ended up on the floor, the bins came apart and it was a giant mess.  Most importantly his collection was out growing it's container.  It drove me nuts!  I had to find a solution...


I saw this on Pinterest and figured I could adapt it to the train theme.  I came up with a cargo box to hold all of those wild animals.  It is constructed of a 1x2 frame and clad with 4" wide cedar fence pickets. Screw eyes on the top and bottom hold bungie cords so the animals can be pulled out and pushed in.  The top is also open for easy access.  The bottom is actually left over chalk board from the train schedule project.  I glued felt to the bottom of the box to protect the wood floor.  Making this box was definately trial and error so I did not take pictures along the way.  I tried to make the demsions fit the spot I wanted to keep the animals in but it ended up a bit bigger than I planned so I had to find a different spot for the box. The finished demensions are 23" wide, 19" deep, and 49" tall.

I had to move the "caution" and "animals" boards to the other side when I had to
change my plans of where to place it in the room


The box ended up in a corner next to his dresser.  The footboard of the bed is only about 3 feet away so it creates a nice out of the way spot.  I did attach the box to the wall so that if he did climb on it, it wouldn't tip over on him.  The best part of this is that the stuffed animals are in their box much more than on the floor.  Searching for a specific animal is easier too when you can reach though the bungie cords and dig around.  This might be my favorite part of Milo new's room.

Thursday, January 24, 2013

{2 In 1 Jacket}

The final project for the Sewing For Boys Sew-Along at Boy, Oh Boy, Oh Boy Crafts is the 2 in 1 jacket.  I can hardly believe it has been a whole year of sewing already!  I'm so glad Stacey chose this for the final project.  I had been wanting to make this jacket and this was just the incentive to finally get it done.  I altered the pattern by adding a hood instead of the collar.


Side one sports a wide wale corduroy with 3 hand embroidered bicycles.  The bicycles make their appearance on the front button placket, the edge of the hood and along the hem line on the back. It also has the welt pockets and a black hood.  The sleeve cuffs turn up to reveal the print from the reverse side.


Side two is a quilting cotton in black with bright multicolored bicycle print.  This side has patch pockets with a vibrant deep yellow bias tape trim along the top.  The hood on this side has a center piece in bright green flanked by the bicycle print. The sleeve cuffs turn up to show the corduroy from the other side.
 
 
I love the way this jacket turned out. I made the size 4/5 without any modifications to the width or lenght and it fits him great.  Side one can be worn with more dressy clothes but shows a bit of attitude with the bicycles peeking out. Side two is a fun print for everyday play. When worn as side one the pockets on the reverse side make the perfect inside pockets to stash boy treasure. 
 

Sunday, December 23, 2012

Trach Christmas Ornament

I made this for a very special nurse and friend who moved away several years ago.  She took care of Milo while he was in the hospital.  After we came home she also worked some over night shifts for us.  When she moved to California just before Christmas I made this ornament for her.


To make this I tied ribbons along the cannula, put some rhinestones around the outer part, and threaded some yarn through the cannula to which I attached some snowflake buttons.  A piece of twill trach tie placed around the base of the outer part, right against the flanges, was used to hang the ornament (it didn't hang right if tied through the holes of the flanges).  I also decorated a little clear bucket to store the ornament in.  On the back of one flange I wrote his name and the year.
 
I still have several trachs that I couldn't donate because the were expired or used.  Every year I intend on making myself and ornament but in the hustle and bustle it just hasn't happened yet.  Maybe I should to it in January for next year's tree!

Merry Christmas and Happy New Year
from my family to yours.